As mentioned, I have decided to confirm that a discounted domain bought from another provider (ie GoDaddy) can be transferred over to Google Domains without issue before going ahead, proving the process by transferring over an existing domain. I have never done this before so I am putting up a complete blow-by-blow how-to on the switching process [as of Mar 2018].


From here it is back to the Google Domains 'Transfer your domain' page. Pop in the domain name (without www.) and hit Continue, which should bring up the following web form.

Then it's back to GoDaddy again to give them the reasons why I am leaving and collect the required authorisation code.


The first task is to navigate to the Google Domains website (https://domains.google/#/)

From there you can either click on MANAGE MY DOMAINS (top right corner) or hit I'D LIKE TO TRANSFER, INSTEAD.
The first will log you in to your active Google account (and who doesn't have one of these??) and bring up your Domains list.

Hitting the link in 'transfer a domain that you already own' will take you to the same page that you would have reached with the 'I'd like to transfer' link under the search box of the Google Domains landing page.
Next, off to GoDaddy to sign in and get the ball rolling.


Signing in brings you into your My Products screen.

From which you need to choose Manage for the domain to be transferred and then scroll down to Additional Settings.

If Domain lock is set to On then you need to choose Edit and unlock the domain, after which a message will pop up at the top of the page confirming the change.

Followed by an e-mail confirmation, which will arrive within a few minutes.

If you refresh the Domain Settings page the alteration will now be visible.

You can now follow the 'Transfer domain away from GoDaddy' link which will take you to a checklist.

So for the first 4 steps of the checklist,
- The admin e-mail address is correct and working;
- There is no current website or e-mail address on this domain to have an issue with;
- Didn't have any privacy on the domain and;
- Have just unlocked the domain.
From here it is back to the Google Domains 'Transfer your domain' page. Pop in the domain name (without www.) and hit Continue, which should bring up the following web form.
Then it's back to GoDaddy again to give them the reasons why I am leaving and collect the required authorisation code.
Copy it out of the e-mail you receive and paste it into the box on the Google Domains Transfer In form and click Continue again, which will yield.
All good. As stated before there is no website or e-mail dependent on this domain so I can let Google manage the DNS settings.
Payment next.
The checkout screens involve entering your contact details and supplying Google with a card number to bill the annual charge to.
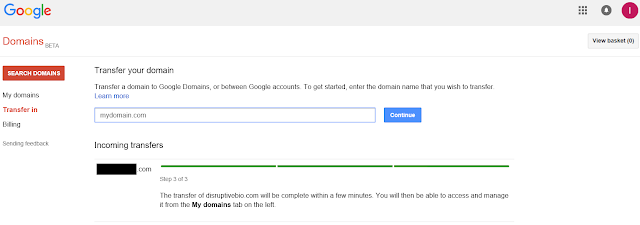
At this point you end up on this screen having completed 1/3 steps.
A formal e-mail, in Courier New no less, contains a link to confirm the transfer,
the link generates a webpage with the same data and a Transfer button.
At this point 2/3 steps are complete.
Now GoDaddy have 5 days to complete the transfer. I presume you can leave the process there to complete. if you wish, but to speed it up I did the following.
Back in GoDaddy, on the Products page, the status of the domain has altered.
Clicking on View details leads to the Pending Transfers screen,
and selecting the Accept or Decline option allows you to accept the transfer.
Refreshing the Google Domains Transfer in page shows the transfer is almost instantaneous.
So the domain transfer process is finished, and a quick refresh on the My Domains page confirms that fact.

Once the e-mail is verified the whole process is complete.
Quite a lot of toing and froing between the two sites, but not really more than 15 mins work.
Comments
Post a Comment