In the general spirit of solving problems there are other ways to contribute beyond writing a blog that no one reads. Whenever I come across a situation that requires me to absorb some new information, whether that be what an earth leakage circuit breaker does, or what happened to Carwood Lipton after the war, or what the legend of the Wandering Jew is about, or how to spell tonneau my first port of call is Wikipedia.
It is truly a fantastic resource and an excellent demonstration of what the web can enable people to create. It has its' issues though; the strength of crowd-sourcing the entire content of the encyclopaedia is also a weakness in that less popular subjects are often not covered to the same depth that some pop-culture topics are. Meaning that it is more or less incomplete in parts.
I can help.
It is possible to edit Wikipedia anonymously, but adding an account is straightforward and allows other users to give feedback on your contributions if required.
Off to the main page then,


The process couldn't be much simpler, so where to start then? Well, when I was looking up how to spell tonneau I landed on the Wikipedia page and had to read some of the contents because I was there (I literally cannot stop myself from doing so). I noticed that the word originates from French, meaning cask or barrel but that a citation needed tag had been applied.


Let's stay with the direct editing mode and Start editing,

this brings up an editing box that looks initially complex but is not too bad. Our section is under ==Origin== (the number of = signs is the heading size of the section, the higher the number the lower the rank). We could have also just clicked on the Edit Source link next to the Origin subtitle on the page, which would have offered up only the section we are interested in editing.
At the end of the section, the text of interest is,
The word is French, meaning 'cask' or barrel.{{cn|date=November 2018}}
the part inside the double curly brackets codes for the citation needed hyperlink.
As I had also found a Wiktionary entry for tonneau when I was looking up its spelling,
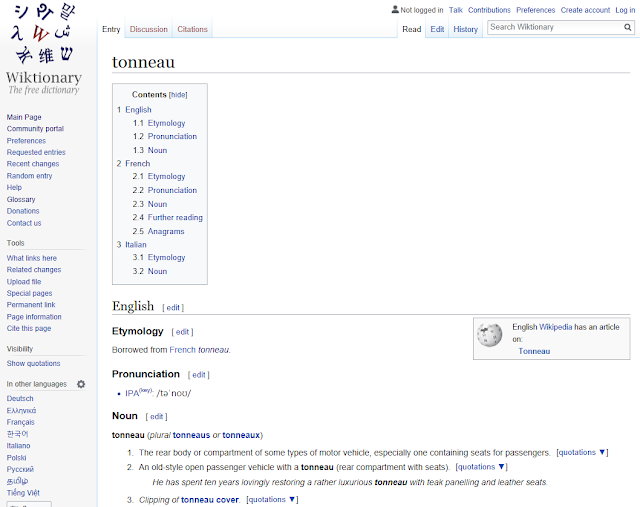


We can either leave it like that and hope someone else comes along to tidy it up, or see if we can find out if there is a style guide for presenting Wiktionary links. But this is further that I want to go right now and I do not have the time. So I will wrap up the edit, giving it a description and marking it as minor.

It is truly a fantastic resource and an excellent demonstration of what the web can enable people to create. It has its' issues though; the strength of crowd-sourcing the entire content of the encyclopaedia is also a weakness in that less popular subjects are often not covered to the same depth that some pop-culture topics are. Meaning that it is more or less incomplete in parts.
I can help.
It is possible to edit Wikipedia anonymously, but adding an account is straightforward and allows other users to give feedback on your contributions if required.
Off to the main page then,

and select Create account from the rank of options at the top right-hand side.

Add in a password, complete the Captcha text and click Create your account and that's it.

The process couldn't be much simpler, so where to start then? Well, when I was looking up how to spell tonneau I landed on the Wikipedia page and had to read some of the contents because I was there (I literally cannot stop myself from doing so). I noticed that the word originates from French, meaning cask or barrel but that a citation needed tag had been applied.

Seems like a relatively straightforward place to start. At the top of the page is a link to Edit source,

which gives two choices, either you can edit the wiki mark-up language text directly or use the Visual Editor.

Let's stay with the direct editing mode and Start editing,

this brings up an editing box that looks initially complex but is not too bad. Our section is under ==Origin== (the number of = signs is the heading size of the section, the higher the number the lower the rank). We could have also just clicked on the Edit Source link next to the Origin subtitle on the page, which would have offered up only the section we are interested in editing.
At the end of the section, the text of interest is,
The word is French, meaning 'cask' or barrel.{{cn|date=November 2018}}
the part inside the double curly brackets codes for the citation needed hyperlink.
As I had also found a Wiktionary entry for tonneau when I was looking up its spelling,

it is just a matter of replacing the citation needed mark with a hyperlink to the Wiktionary entry.
Let's just guess that we need to use a <ref> tag and then insert a link between them, we can use Show preview to see how the edit will look.


It looks OK at the section level, but the reference list entry looks a little clunky.


We can either leave it like that and hope someone else comes along to tidy it up, or see if we can find out if there is a style guide for presenting Wiktionary links. But this is further that I want to go right now and I do not have the time. So I will wrap up the edit, giving it a description and marking it as minor.

and Publish changes leaving the world an infinitesimally better place.
Comments
Post a Comment