As part of the process of obtaining an AdSense account for the blog I need to create some static pages to hold housekeeping information.
Fortunately Blogger already has this function in hand with 'Add pages to your blog'. The pages can contain whatever you want and Google isn't stingy about how many you can have, allowing the creation of an unlimited number of pages.
There are two steps to adding pages to a blog; creating them and adding links to them to the blog. But before we start here is the current layout of the blog,
It is pretty minimal, and that is OK. With a small title and a link to a search function at the top; and three links to the side, one for a drop-down that gives access to the archive of posts, one to the set of labels that I experimented with in a previous post and one to Report abuse, which goes off to Blogger not me. There is a mix of fonts which I hadn't noticed before, but that is a problem for another day.
The first task, then, is to create some placeholder pages. Selecting the Pages tab on the Blogger menu returns a blank screen informing us that There are no pages.
For the AdSense application process we need to create three static pages titled, About, Contact and Privacy. Hitting + NEW PAGE at the top of the menu of Blogger tabs will move you into the editor, where all the familiar content creation tools and options are present.
As with posts you have the option to Preview, Save or Publish pages at this point. However publication is required before you can add links to them on the blog. As I am not concerned with the content of the pages I'll move onto sorting how they are displayed on the front of the blog once you have the content for them.
So, off to another of Blogger's tabs, the Layout tab,
Blogger uses what it calls Gadgets to control how or whether certain types of information are presented on a blog. Some are optional, some are not (being part of the theme); most of the non-optional ones can be made invisible, but some can't (do you really want a blog with no posts?).
As we want to put links to our newly created pages onto the blog, select Add a Gadget from the Sidebar pane and choose Pages from the list that is displayed in the pop-up window,
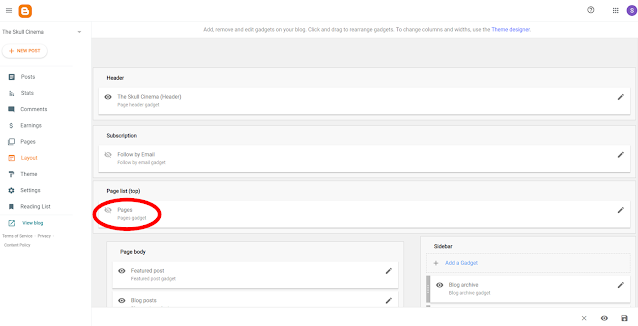
or in the case of the theme that the blog is using (Notable Light) the Pages Gadget is already present underneath the Header but set as not visible (circled in red on the first picture of the Layout tab above).
Either way, once you have it on the layout, clicking on the pen icon of the Pages Gadget will open its' dialog box.
Here you can select which Pages to show and choose the List Order of the pages. Using a Title will allow the pages to be grouped together and multiple instances of the Pages gadget can be added to a blog giving a series of lists of pages, each of which can be grouped under their own title.
Once you tick the Show Pages checkbox and select Save the dialog will close and you will be returned to the Layout screen where you can preview your changes.
The effect of the alterations (ie adding the pages and making the gadget visible) is to add a tidy little group under the blog title. By adding another copy of the gadget to the Sidebar pane and making the first copy invisible I could have the list on the side rather than the top,
which looks better, but for some reason the font has changed. If you try dragging the Pages Gadget from the Sidebar pane to the Footer pane you get this instead.
Not good. Of course it should be possible to alter the fonts and positions of these elements but that means diving into the code for the theme of the blog (all 4,000 lines of it) and this is more detail than I want to tackle for now. So instead I'll put up with the font being not quite right and have the links on the sidebar.
As I'm providing contact details one other thing I can do is make the Report Abuse gadget invisible (as it is a non-optional Gadget on this Theme) by unticking the Show Report abuse checkbox.
For optional Gadgets taking them off a page is just a matter of hitting Remove in their dialog box.
Once your changes have been made and you are happy with the previewed result you can hit Save and the alterations to the layout will be made live.
Done.


Comments
Post a Comment