Now I have a virtual Raspberry Pi set up this should be a discussion on how to get Home Assistant (HA) installed on it. Correct? Well, no.
Once I'd got the virtual Raspberry Pi up and running, and forearmed with my (limited) knowledge of how VirtualBox works, I went looking for a distro of Home Assistant that would run on the Raspberry Pi Desktop OS. Only this time I made sure I read the whole list and right at the bottom I found what I was looking for - Install Home Assistant on Other Systems. However, instead of needing a prepared Raspberry Pi this protocol will install everything in a single process. It turned out, as I read another manual, that Home Assistant is actually an OS in and of itself. The Open Home Foundation, the developer of HA, uses another piece of open-source software, Buildroot, to craft a bespoke version of Linux it calls the Home Assistant Operating System (HAOS; previously known as HassOS).
Although the process of setting up the HA virtual machine (VM) was a little different to that for a Raspberry Pi, it was not massively dissimilar. The first task was to obtain a copy of the requisite disk image from the HA website; this isn't an ISO file but an image of an HDD in .virtualdiskimage format. In our case the this was the VirtualBox (.vdi) file (circled in red).

It was not small, at over 390 MB, and unzipped to a single 850 MB disk image file. Next, a folder was set up for the HA VM to run from and the .vdi file moved into it. Now that was all ready it was over to VirtualBox (VB) to set up a new VM.

We don't have an ISO this time and the required Type and Version info is given on the HA installation page.

The minimum hardware configuration is 2 GB of Base Memory and two Processors. I won't add any more than the base requirements at the moment, as I am only interested in running one app and I can always extend the VM with extra hardware if I need more oomph at a later date.
On the Hardware page of the Create VM wizard you need to select Enable EFI (red circle), this is a system that is involved in the boot-up of the HAOS.

Onto the Virtual Hard disk page. As we already have an HDD image, choose Use an Existing Virtual Hard Disk Drive, hit the Folder icon next to the current (wrong) vHDD name and the Hard Disk Selector box will appear bringing up a list of attached vHDDs.

Click the Add icon under Medium Selector and find the .vdi file you extracted earlier. It should now appear on the list of vHDDs as an unattached vHDD. With it highlighted select Choose and this will attach the .vdi file to your nascent HAOS computer.

Onto the Summary screen.

As you can see above I forgot to move the .vdi file into the drive I wanted it to run from. It won't affect the performance of the machine, but for tidiness' sake I'll describe how to move a vHDD later.
There are still a couple more settings to alter before starting the HAOS machine for the first time. With the HA system selected, go to Settings > Network and select Attached to: Bridged Adapter, this network mode is used to run VMs that are fully accessible from the physical local area network (ie your local home automation products).

Then make the alteration for the audio controller, Audio > Audio Controller: Intel HD Audio, which sets the VM to emulate this type of sound controller.

The HAOS VM is now prepared but has not been "switched on" yet.

Time for the big green Start arrow. One minute later the VM was up and running.

From here the user interface to HAOS is via a web browser on the host PC at homeassistant.local:8123.

It says the installation may take 20 minutes but in reality it was just another minute or two.

The onboarding protocol was simply a matter of setting up things like a Name, Username and password and giving it an approximate location (so it can track day/night cycles) and you are in.

All done!
As before, with the Raspberry Pi, now we need to know how to shut it down and how to update it.
The process to shut down the system wasn't obvious at first but Settings > ⋮ > Restart Home Assistant opens the Restart Home Assistant dialogue and from there Advanced Options dropdown > Shut down system will stop the HA VM.
Alternatively, Settings > System > [Power button symbol] (top right corner) gets you to the same Restart Home Assistant dialogue box.
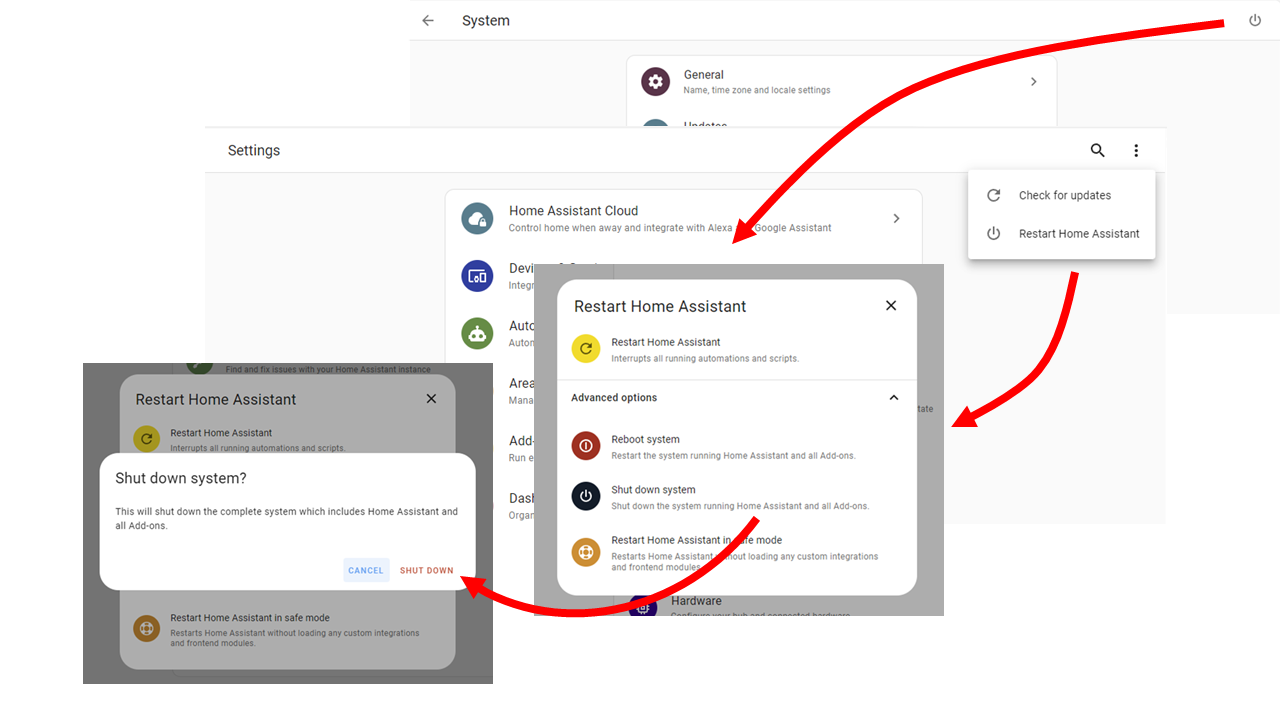
The web interface won't give you much detail on the system shut down process (just a small information note in the bottom left, which on completion reads Connection lost. Reconnecting…) and the VM sits for a bit before scrolling through its' shutdown protocol but the whole thing only takes around a minute.
To update the system you'll either get a notification that an update is available or you can go to System > ⋮ > Check for updates. Any available updates will be at top of the menu or under Settings > System > Updates.

Again the system isn't too good at keeping you informed about the progress of the update but most often a system reboot is needed, so it will need a few minutes each time to complete the process.
As I mentioned above, you might end up with your HA vHDD in the wrong place. In that case move the .vdi file to where you want the VM to run from and, on VB, go to Settings > Storage.
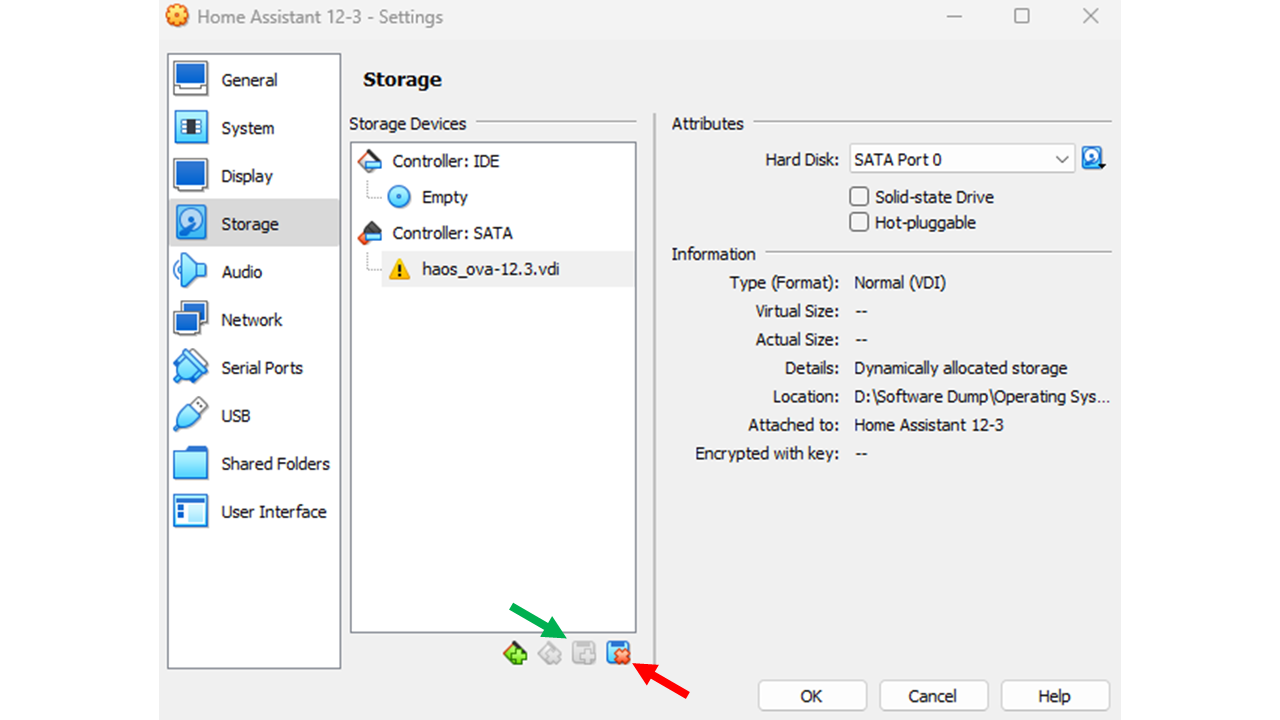
Select the existing vHDD, click on the Remove Attachment icon (red circle), then on the Add Attachment icon (green circle) reattaching the vHDD by going back through attachment process as you did before.
Now that's complete we can move onto getting Grocy running on Home Assistant.
Comments
Post a Comment