Now my computer is set up to run virtual machines (VMs) I should be able to load up a virtual Raspberry Pi and install Home Assistant on that. Correct? Well…hmm, it will be instructive to go through the process, I hope, even if the initial outcome was not was intended.

On opening, right at the top of the VirtualBox (VB) window, there is a large blue starburst symbol with the word New underneath (circled in red above). Clicking this will start a wizard that will help you to create a VM.

The fields of the first dialogue box are pretty self-explanatory; the Name of the VM can be anything you want; the Folder is simply the location where the VM's files will sit; and the ISO Image is the installation disc (or the file version thereof) from which you will boot the operating system. As you can see, I've chosen a Raspberry Pi OS ISO, which is a Linux Type operating system that is actually based on Debian (Version), obtained from the Raspberry Pi website.
At this point eagle-eyed observers, or anybody who's used VirtualBox before, will recognise my mistake here. Instead of choosing a PC-compatible distro (called Raspberry Pi Desktop) I tried to install a 64-bit Raspberry Pi OS. There was a big hint at the bottom (red box) in the blue information quote 'OS type cannot be determined from the selected ISO,…' but I missed it.
This is what it should have looked like.

People commonly don't write up their mistakes and they can be often just as instructive as something done properly. There is nothing worse than sitting there after having followed someone else's set-up protocol and ending up with an error screen with no knowledge of what has gone wrong or what to do to fix it.
So I'll skip the unattended (automatic) installation and follow the manual installation path, as I did with the wrong ISO.

The next dialogue box allows you to set the base memory and number of processors for the virtual machine. In the case of Raspberry Pi, which would normally run on a single processor computer with a reasonably small amount of memory, I chose a single CPU and two GB of base memory.

After this you must set up a virtual hard disc drive for the virtual PC to use. Again, as Raspberry Pi is a lightweight operating system it only needs a small virtual HDD, 20 GB is probably quite large but I didn't know how much space the Home Assistant installation would require. However, unlike a physical hard drive the virtual HDD only takes as much space as the files within it so even though it has a 20 GB capacity it won't use that much footprint on the host PC HDD.

Finally the wizard completes with a summary page.

The next stage is to start the VM, at which point it should install the operating system from the ISO image that you have given it and set up the computer. Unless you've used the wrong ISO that is.

Ah well, the fix was not complicated. It just required me to read the ******* manual and not be a muppet. Replacing the ISO with the correct one for Windows systems solved the issue. In my defense, I wasn't aware that the virtualisation software wasn't virtualising the whole system stack, but I am now.
I won't go through go through the Raspberry Pi OS installation steps, as there are plenty of tutorials out there (here are a couple of examples if you need 1/2), but you should end up with something looking like this.

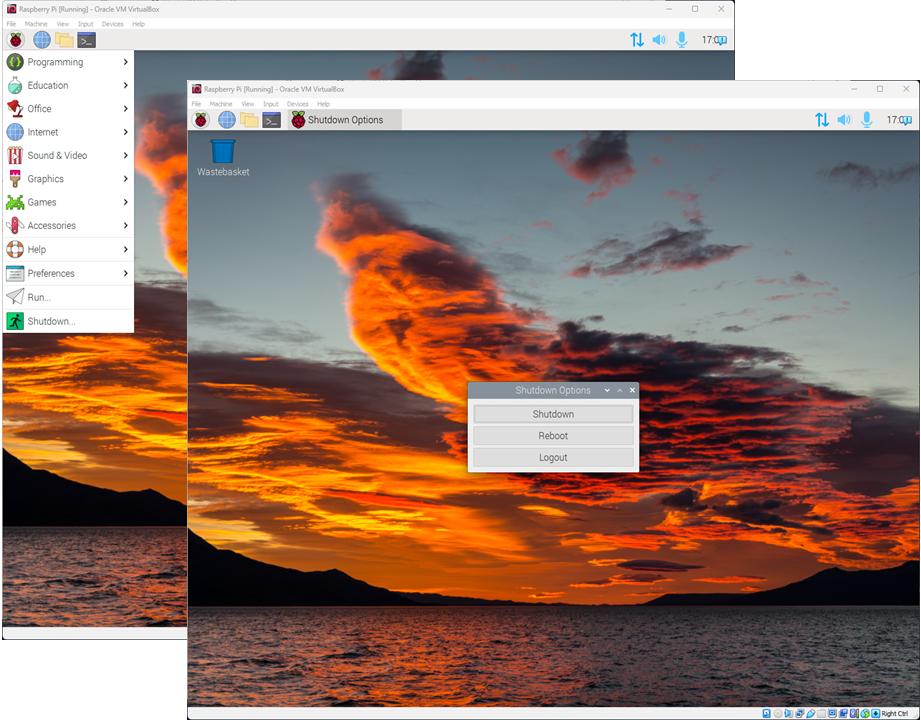
Finally, the two things we need to know now are, A) how to switch it off and B) how to keep it updated.
To shut the virtual Raspberry Pi machine down hit the raspberry icon and then Shutdown… and follow the instructions.
Keeping the VM updated is a little more involved but not complicated. Press CTRL+ALT+T to open a Terminal window.
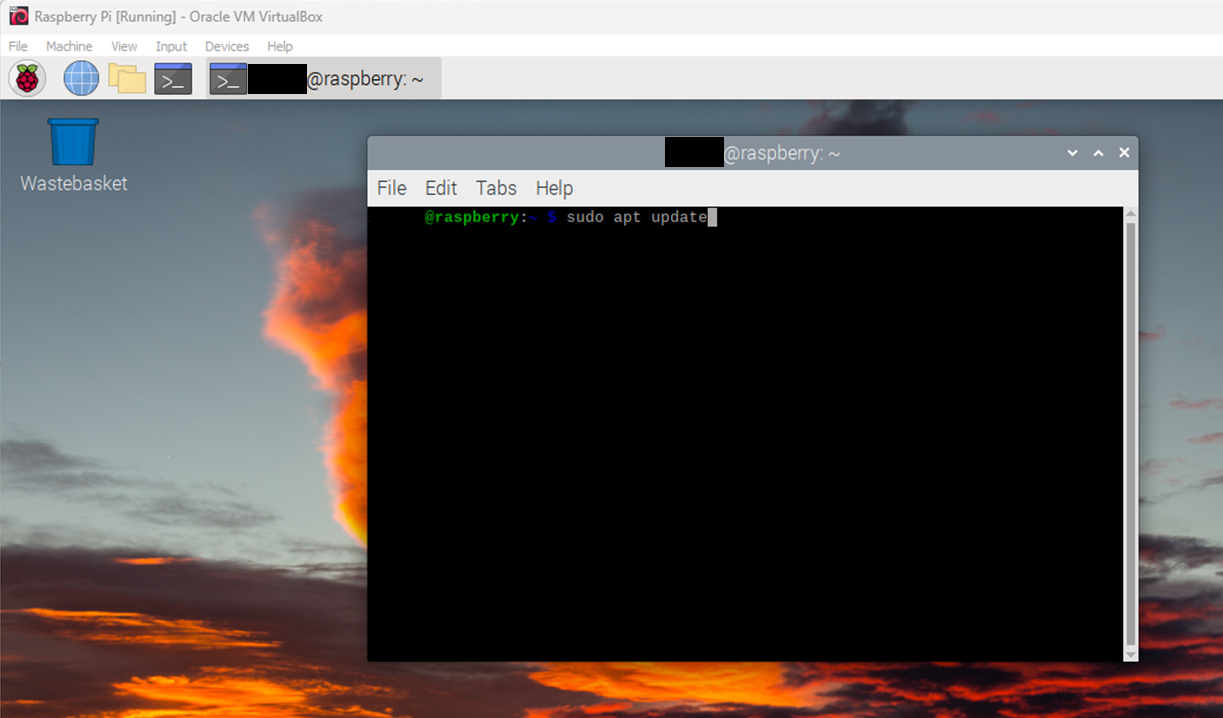
Then type in the following,
To get a list of updates, upgrade & reboot
sudo apt update↵
sudo apt full-upgrade↵
sudo reboot↵
To clean up the installation afterwards
sudo apt autoremove↵
sudo apt clean↵
To confirm the installation is working
sudo reboot↵
Et violà! Everything is shipshape. Now on to getting Home Assistant installed.
Comments
Post a Comment